
OAuth
At its core, OAuth ("Open Authorization") is a mechanism for applications to access the Asana API on behalf of a user, all without the application having access to the user's username and password. Instead, the application gets a token, which can be used in subsequent API calls through the addition of an Authorization header:
-H "Authorization: Bearer ACCESS_TOKEN"In the above example,ACCESS_TOKEN should be replaced by the actual token received during the token exchange.
Most of the time, OAuth is the preferred method of authentication for developers, users, and Asana as a platform. If you are building a custom app, you should consider building a secure OAuth flow to authenticate users of your app.
Quick referenceIf you are already using an OAuth library and/or have a deep understanding of OAuth, you may wish to skip ahead to the quick reference below:
- Asana supports the authorization code grant flow
- Applications can be created from the developer console (i.e., "My apps")
- The endpoint for user authorization is
GEThttps://app.asana.com/-/oauth_authorize- The endpoint for token exchange is
POSThttps://app.asana.com/-/oauth_token- The endpoint for revoking a token is
POSThttps://app.asana.com/-/oauth_revoke- Once an access token (i.e., bearer token) has been obtained, your application can make API requests on behalf of the user
Open source examplesYou can access an open source examples for OAuth servers, provided in the following languages:
Feel free to follow the comments in the server files as you inspect the overall OAuth flow. Note: These OAuth servers should only be used for testing and learning purposes.
In addition to learning about how to use OAuth on the Asana platform (i.e., through this guide), feel free to review the official OAuth 2.0 specification.
Overview of the OAuth process
This section describes the overall OAuth process (i.e., with the authorization code grant flow, which is the most common).
OAuth librariesWe recommend using a library (available in your language of choice) to handle the details of OAuth. Along with expediting development time, using a library can help mitigate the risk of security vulnerabilities due to inexperience or oversight.
As a prerequisite, ensure that you have registered an application with Asana. Take note of the application's client ID and the client secret (which should be protected as a password). Then, to begin:
-
A user arrives at your application and clicks a button that says Authenticate with Asana (or Connect with Asana, etc.)
-
The user is taken to the user authorization endpoint, which displays a page that asks the user if they would like to grant access to your third-party application
-
If the user clicks Allow, they are redirected back to your application, bringing along a special
codein the query string -
The application makes a request to the token exchange endpoint to exchange that
code, along with the application's client secret, for two tokens:- An access token (i.e., a bearer token, which lasts an hour)
- A refresh token (which can be used to fetch a new access token when the current one expires)
-
Using this access token, the application can now make requests against the Asana API for the next hour
-
Once the access token expires, the application can use the token exchange endpoint again (i.e., without user intervention) to exchange the refresh token for a new access token. This can be repeated for as long as the user has authorized the application
Authorization code grantFor additional details and a diagram of the authorization code grant flow, see Authorization Code Grant in the OAuth 2.0 specification.
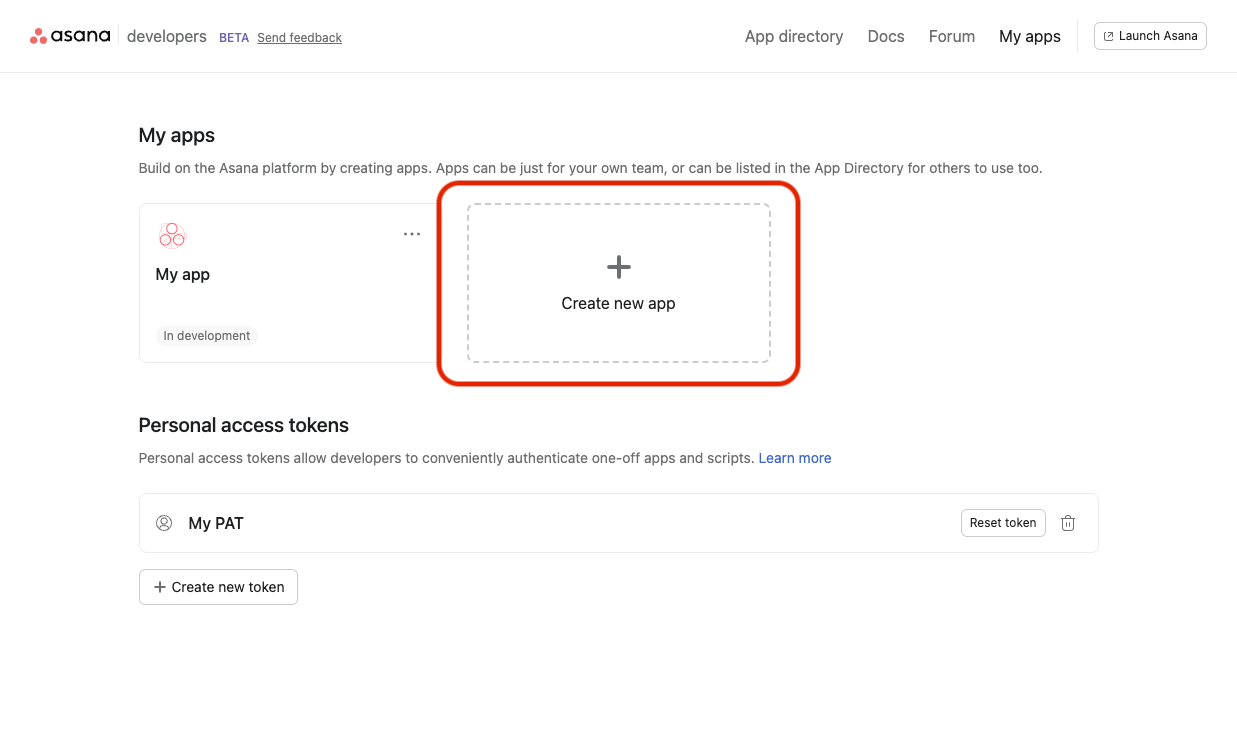
Register an application
You must first register your application with Asana to receive a client ID and client secret. To do so, first visit the developer console and select Create new app, as shown below:
To build a proper OAuth flow, you must supply your new application with three key details:
- App name - The name for your application. Users will see this name when your application requests permission to access their account as well as when they review the list of apps they have authorized.
](https://files.readme.io/82a1a1e-Screenshot_2023-04-20_at_3.48.22_PM.png)
The app name can be changed at any time in the Basic information tab in the sidebar of the developer console
- Redirect URL - Otherwise known as the callback URL, this is where the user will be redirected upon successful or failed authentication. Native or command line applications should use the special redirect URL
urn:ietf:wg:oauth:2.0:oob. For security reasons, non-native applications must supply a "https" URL (more on this below).
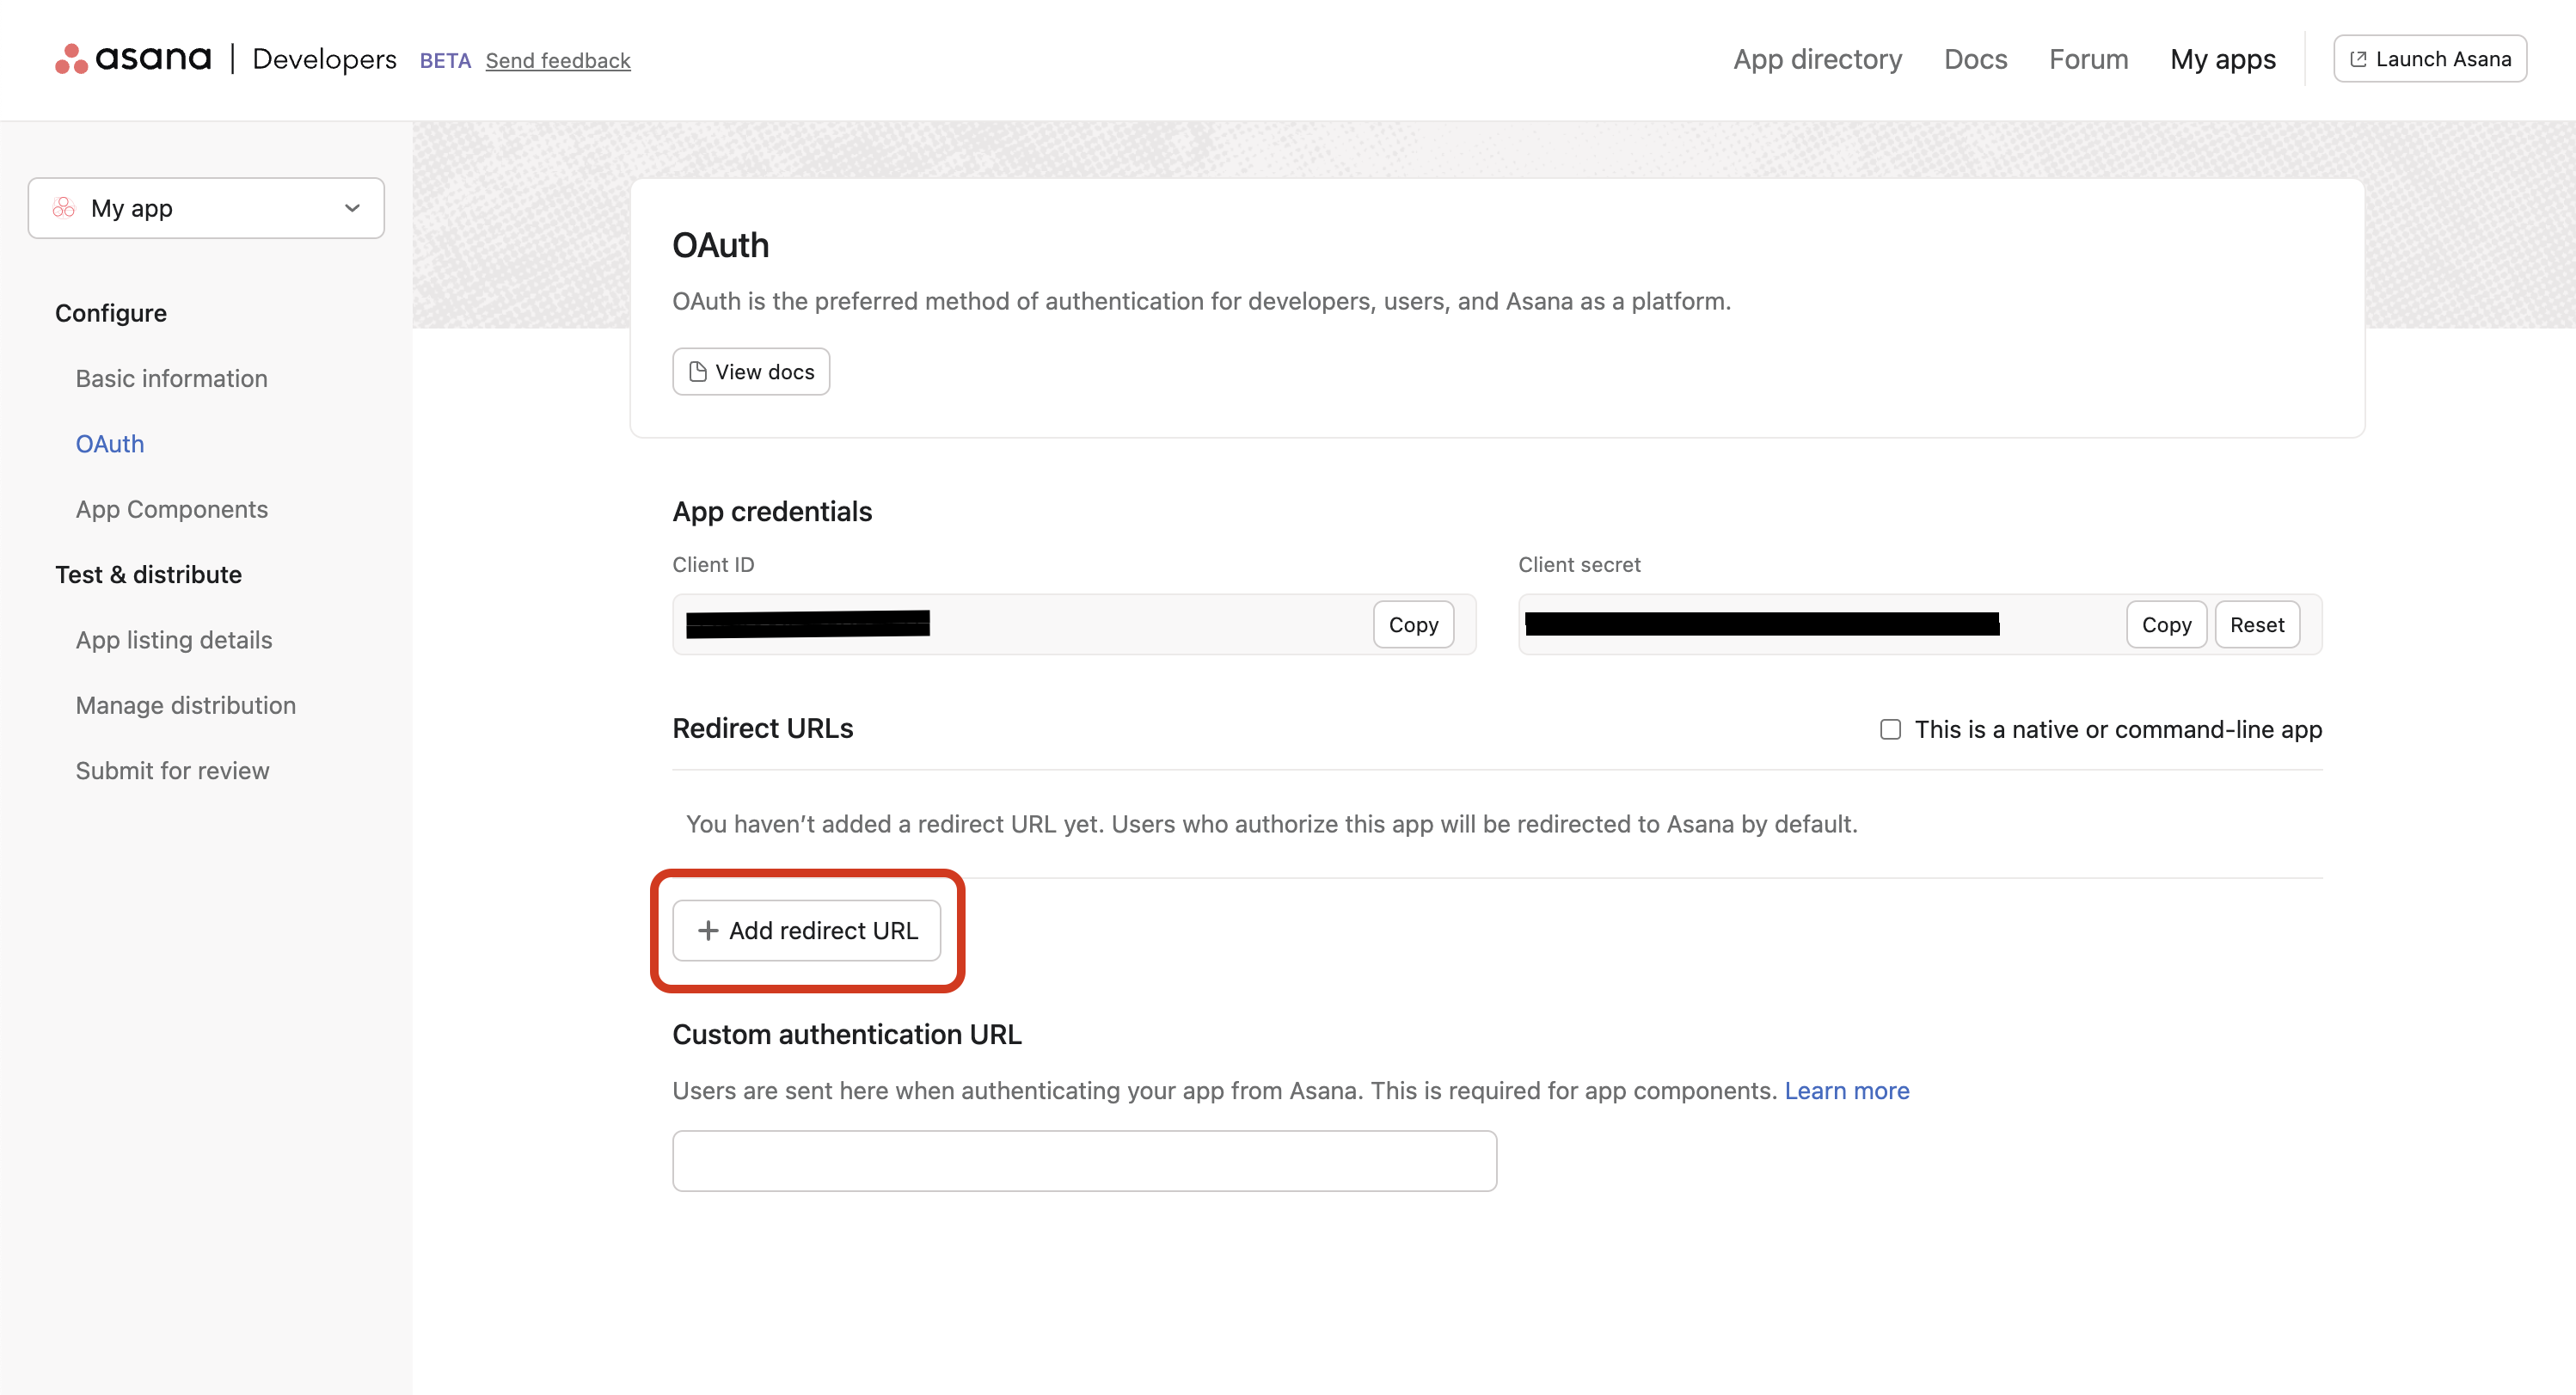
Client secretYour client secret is a secret, and it should never be shared with anyone or added into source code that others could gain access to. If you need to reset your client secret:
- Select your app in the developer console
- Navigate to the OAuth tab in the sidebar
- Select Reset next to your client secret
- (OAuth) Permission scopes: You'll need to specify which OAuth scopes your app can request during this registration step. Only these pre-approved scopes will be accepted later during user authorization.
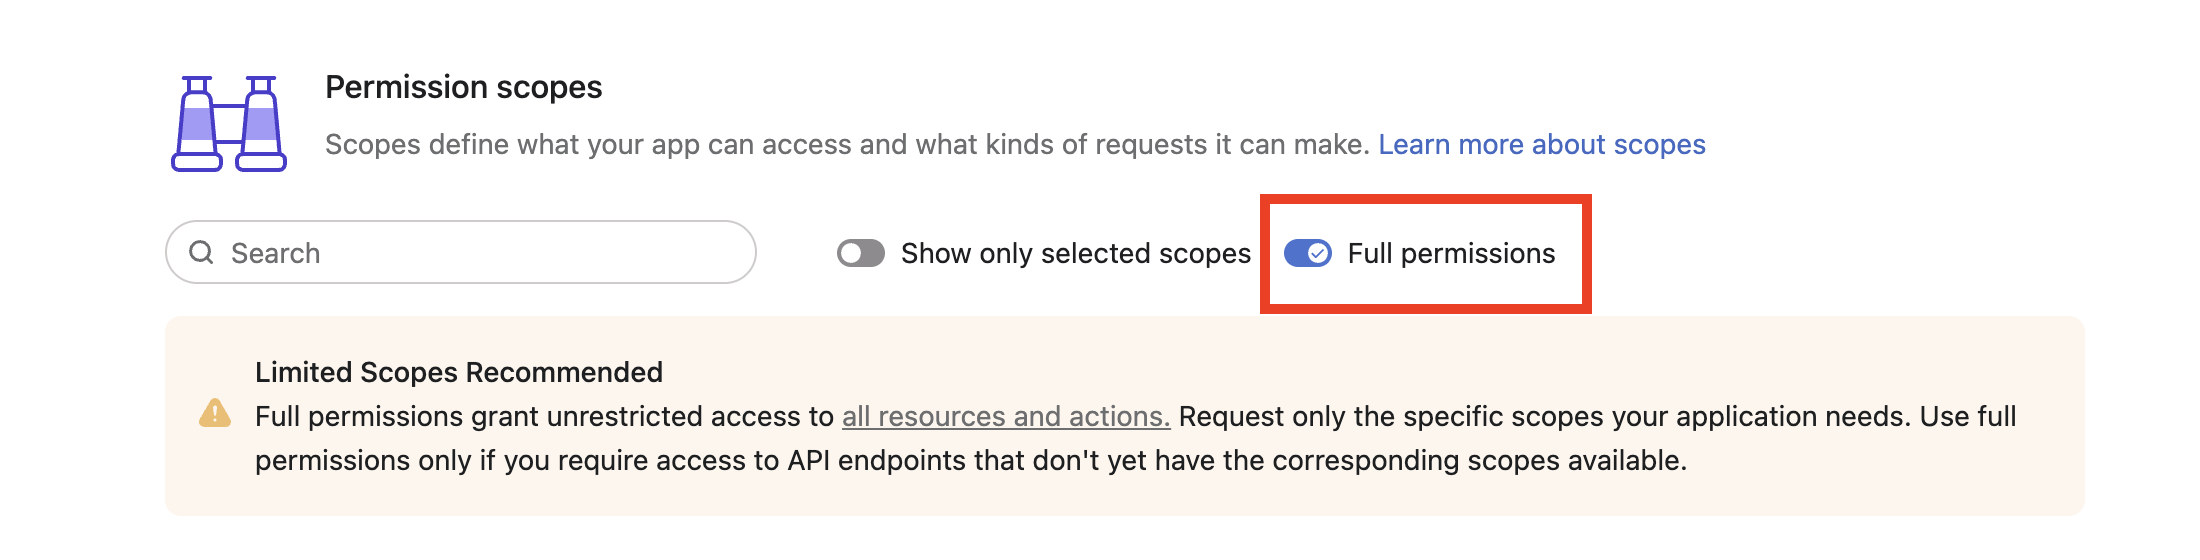
You can always update the list of scopes later in the developer console (under OAuth > Permission scopes). Below is an example of what it looks like in the developer console. Note that you can either toggle Full permissions (which grants access to all endpoints) or manually choose a specific set of OAuth scopes for your app:
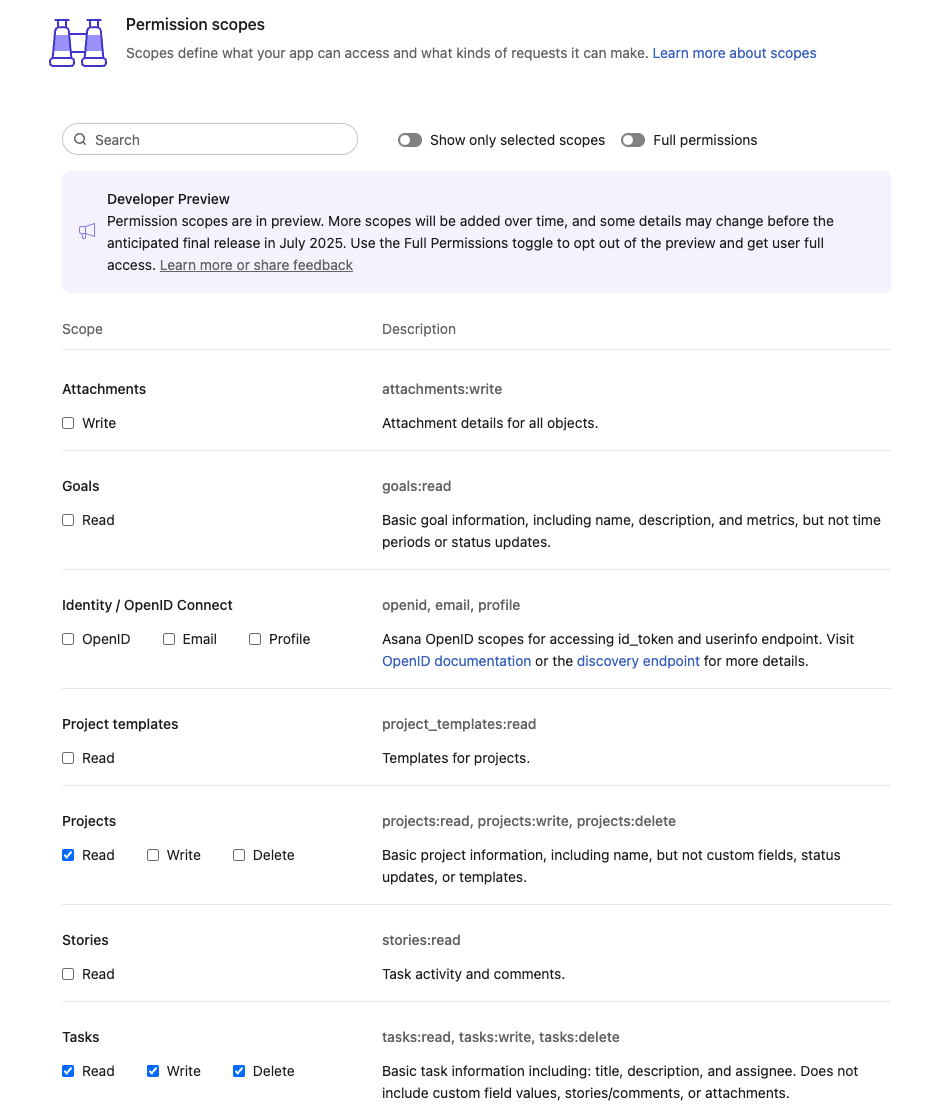
In the above example, the following OAuth scopes were chosen (we'll review OAuth scopes in more detail shortly in this guide):
projects:readtasks:readtasks:writetasks:delete
Along with all the app registration information above, you can also upload an icon, a description, and other basic information about your application. All of these attributes can also be changed later as well.
Once you have created an app, the OAuth tab in the sidebar will include a client ID (needed to uniquely identify your app to the Asana API) as well as a client secret.
User authorization endpoint
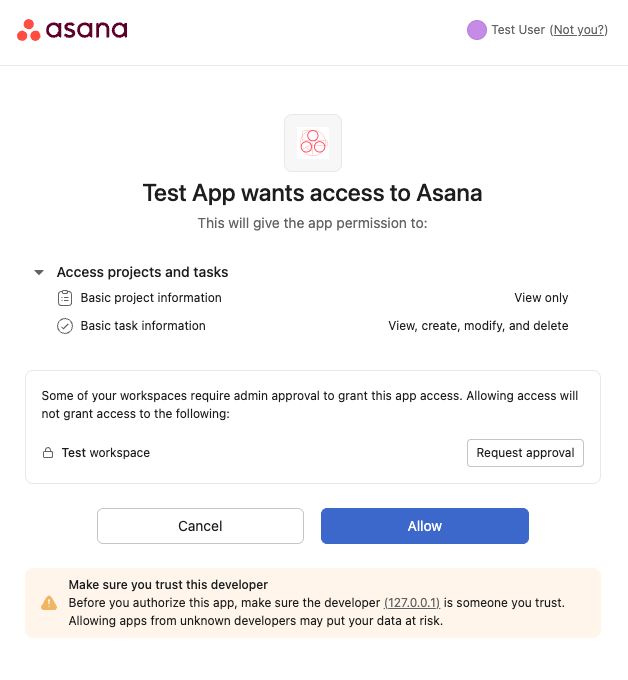
During the user authorization step, the user is prompted by the application to either grant or deny the application to access to their account.
The API endpoint for user authorization is: GET https://app.asana.com/-/oauth_authorize
App distribution settingsIn order for a user to be able to authorize the OAuth application via this user authorization endpoint, the application must be available in the user's workspace.
If you have not yet configured your application's distribution settings, visit the manage distribution documentation before moving forward.
Request
Here is an example of basic link that sends a user to https://app.asana.com/-/oauth_authorize:
<a
  href="https://app.asana.com/-/oauth_authorize
?client_id=753482910
&redirect_uri=https://my.app.com
&response_type=code
&state=thisIsARandomString
&code_challenge_method=S256
&code_challenge=671608a33392cee13585063953a86d396dffd15222d83ef958f43a2804ac7fb2
&scope=projects:read tasks:read tasks:write tasks:delete"
>
  Authenticate with Asana
</a>
This example usesscopes chosen during the app registration example above. The scope parameter is space-separated but must be URL-encoded in practice (i.e., spaces become %20).
By clicking on Authenticate with Asana link in the above example, the application redirects the user to https://app.asana.com/-/oauth_authorize, passing query parameters along as a standard query string:
| Query parameter | Description |
|---|---|
client_id (required) | The client ID uniquely identifies the application making the request |
redirect_uri (required) | The URI to redirect to on success or error. This must match the redirect URL specified in the application settings |
response_type (required) | Must be either code or id_token, or the space-delimited combination: code id_token |
state (required) | Encodes state of the app, which will be returned verbatim in the response and can be used to match the response up to a given request |
code_challenge_method (conditional) | PKCE The hash method used to generate the challenge. This is typically S256 |
code_challenge (conditional) | PKCE. The code challenge used for PKCE |
scope | A space-delimited set of one or more scopes to get the user's permission to access. If no scopes are specified, the default OAuth scope will be used—provided the app was originally registered with Full permissions. |
The resulting authentication screen will look something like this to the end-user:
OAuth scopes
Asana uses OAuth 2.0 for secure user authorization. Scopes allow your app to request only the access it needs, following the principle of least privilege. That is, OAuth scopes define which parts of the Asana API your app can access. This helps users trust your app and ensures their data is protected.
Register for scopes before requesting themIf you request a scope that is not in your app's approved (i.e., registered) list, the user will see a
forbidden_scopeserror on the authorization page.You can update the scopes your app is allowed to request by editing your app's settings in the developer console. Visit the developer console, navigate to OAuth in the sidebar, then select your preferred scopes under Permission scopes.
What scopes are available?To view all scopes currently available view its documentation.
Full permissions: Opting out of scopes
Using scopes is strongly recommended, however, scopes are not yet available for every Asana API endpoint. If you need to use an endpoint which does not yet have scopes associated with it, you can toggle on Full permissions in the Developer Console under OAuth > Permission Scopes. A full list of scopes is available here.

Scope structure
Each scope follows the format: <resource>:<action>
Where:
<resource>refers to an object (e.g.,tasks,projects,users)<action>is one of:read,write, ordelete- Note: these do not imply inheritance (e.g.,
writedoes not grantreadaccess)
- Note: these do not imply inheritance (e.g.,
For example:
tasks:read– View basic task information like name and assigneeprojects:write– Create or modify projectsusers:read– Access user information like email and profile picture
Related object fields in responses
Asana’s data model is graph-based, so many endpoints include nested related objects (e.g., a task object may include the assignee, which is a user object). By default, only the following fields are available for these related objects without additional scopes:
gidnameortitleresource_typeresource_subtype
Fields which are not in this list will be omitted. If you request any additional fields (using the opt_fields query parameter), your app must request the corresponding scope. For example:
GET /tasks/123?opt_fields=assignee.emailThis request requires the users:read scope. Without it, you’ll receive a 403 Forbidden error.
Request a subset of scopes
Apps with registered scopes must specify scopes at the authorization endpoint using the scope query parameter. Previously, this was optional.
- You may request a subset of the scopes you registered for. This is useful if you do not need all scopes initially (for example, if the user is only using a subset of the features your app offers) and you would like to progressively ask for additional access as needed.
- To request additional scopes, you can send the user back to the authorization endpoint. Subsequent requests will not be additive. You must specify the full set of scopes needed.
- To check which scopes are authorized for a given access token or refresh token, you may use the token introspection endpoint.
For example, in the scenario above, we showed an app registered with these scopes: projects:read, tasks:read, tasks:write, and tasks:delete. However, this app may request only the project:readscope when requesting authorization:
<a
  href="https://app.asana.com/-/oauth_authorize
?client_id=753482910
&redirect_uri=https://my.app.com
&response_type=code
&state=thisIsARandomString
&code_challenge_method=S256
&code_challenge=671608a33392cee13585063953a86d396dffd15222d83ef958f43a2804ac7fb2
&scope=projects:read"
>
  Connect with Asana
</a>
Response
If either the client_id or redirect_uri do not match, the user will simply see a plain-text error. Otherwise,
all errors will be sent back to the redirect_uri specified.
The user then sees a screen giving them the opportunity to accept or reject the request for authorization. In either case, the user will be redirected back to the redirect_uri.
Below is an example URL through which a user is redirected to the redirect_uri:
https://my.app.com?code=325797325&state=thisIsARandomString| Query parameter | Description |
|---|---|
code | If value of response_type is code in the authorizing request, this is the code your app can exchange for a token |
state | The state parameter that was sent with the authorizing request |
Preventing CSRF attacksThe
stateparameter is necessary to prevent CSRF attacks. As such, you must check that thestateis the same in this response as it was in the request. If thestateparameter is not used, or not tied to the user's session, then attackers can initiate an OAuth flow themselves before tricking a user's browser into completing it. That is, users can unknowingly bind their accounts to an attacker account.
In terms of requirements, the state parameter must contain an unguessable value tied to the user's session, which can be the hash of something tied to their session when the OAuth flow is first initiated (e.g., their session cookie). This value is then passed back and forth between the client application and the OAuth service as a form of CSRF token for the client application.
For additional security resources, see:
- OAuth 2.0 Security Best Current Practice
- Prevent Attacks and Redirect Users with OAuth 2.0 State Parameters
Token exchange endpoint
The token exchange endpoint is used to exchange a code or refresh token for an access token.
The API endpoint for token exchange is: POST https://app.asana.com/-/oauth_token
Request
When your app receives a code from the authorization endpoint, it can now be exchanged for a proper token. At this point, your app should make a POST request to https://app.asana.com/-/oauth_token, passing the parameters as part of a standard form-encoded POST body (i.e., passing in the data into a request with header 'Content-Type: application/x-www-form-urlencoded')
Below is an example request body in a POST request to https://app.asana.com/-/oauth_token and an example cURL call:
{
  "grant_type": "authorization_code",
  "client_id": "753482910",
  "client_secret": "6572195638271537892521",
  "redirect_uri": "https://my.app.com",
  "code": "325797325",
  "code_verifier": "fdsuiafhjbkewbfnmdxzvbuicxlhkvnemwavx"
}
curl --location 'https://app.asana.com/-/oauth_token' \
--header 'Content-Type: application/x-www-form-urlencoded' \
--data-urlencode 'grant_type=refresh_token' \
--data-urlencode 'refresh_token=<YOUR_REFRESH_TOKEN>' \
--data-urlencode 'client_id=<YOUR_CLIENT_ID>' \
--data-urlencode 'client_secret=<YOUR_CLIENT_SECRET>'
Sending theclient_secretIf you have a
client_secret, this request should be sent from your secure server. The browser should not see yourclient_secret(i.e., theclient_secretshould never be exposed in client-side code).
Details of each parameter are described below:
| Parameter | Description |
|---|---|
grant_type (required) | One of authorization_code or refresh_token (see below for more details) |
client_id (required) | The client ID uniquely identifies the application making the request |
client_secret (required) | The client secret belonging to the app, found in the Basic information tab of the developer console |
redirect_uri (required) | Must match the redirect_uri specified in the original request |
code (required) | This is the code you are exchanging for an authorization token |
refresh_token (conditional) | If the value of grant_type is refresh_token, this is the refresh token you are using to be granted a new access token |
code_verifier | This is the string previously used to generate the code_challenge. |
Response
In the response to the request above, you will receive a JSON object similar to the example below:
{
  "access_token": "f6ds7fdsa69ags7ag9sd5a",
  "expires_in": 3600,
  "token_type": "bearer",
  "data": {
    "id": 4673218951,
    "gid": "4673218951",
    "name": "Greg Sanchez",
    "email": "[email protected]"
  },
  "refresh_token": "hjkl325hjkl4325hj4kl32fjds"
}
Details of each property are described below:
| Property | Description |
|---|---|
access_token | The token to use in future requests against the API. This token is only valid for the scopes requested during user authorization. To gain additional permissions, the user must reauthorize the app with an updated set of scopes. |
expires_in | The number of seconds that the token is valid, typically 3600 (one hour) |
token_type | The type of token (in our case, bearer) |
refresh_token | If exchanging a code, this is a long-lived token that can be used to get new access tokens when older ones expire |
data | An object encoding a few key fields about the logged-in user. Currently, this is the user's id, gid, name, and email |
Token expiration
When an access (bearer) token has expired, you'll see the following error when using such a token in an API request:
The bearer token has expired. If you have a refresh token, please use it to request a new bearer token, otherwise allow the user to re-authenticate.
You can get a new access token by having your application make a POST request back to the token exchange endpoint using a grant type of "refresh_token". In the same request you must also pass in your long-lived refresh_token from the original token exchange request.
Note on token formatAsana API tokens should be treated as opaque. Token formats may change without notice. Validating a token’s format on the client side could result in unexpected breakages. This applies to any Asana API tokens, including: personal access tokens, service account tokens, and both OAuth refresh tokens and access tokens.
Token deauthorization endpoint
An authorization token can be deauthorized or invalidated (i.e., revoked) by making a request to Asana's API.
The endpoint for revoking a token is: POST https://app.asana.com/-/oauth_revoke
Request
Your app should make a POST request to https://app.asana.com/-/oauth_revoke, passing the following parameters as part of a standard form-encoded POST body:
| Parameter | Description |
|---|---|
client_id (required) | The client ID uniquely identifies the application making the request. |
client_secret (required) | The client secret belonging to the app, found in the details pane of the developer console |
token (required) | The refresh token that should be deauthorized. Access tokens (i.e., bearer tokens) will be rejected |
The body should include a valid refresh token, which will cause the refresh token and any associated bearer tokens to be deauthorized. Bearer tokens are not accepted in the request body since a new bearer token can always be obtained by reusing an authorized refresh token.
Response
A successful response with a 200 status code indicates that the token was deauthorized or not found. An unsuccessful response with a 400 status code will be returned if the request was malformed due to missing any required fields or due to an invalid token (such as a bearer token).
Token introspection endpoint
The token introspection endpoint provides information about an Asana API token:
The API endpoint for token introspection is: POST https://app.asana.com/-/token_info
Request
POST https://app.asana.com/-/token_info with standard form-encoded request body:
| Request Body Parameter | Description |
|---|---|
token (required) | Token string for an OAuth access or refresh token, personal access token, or service account token |
Response
The response is similar to the token exchange endpoint:
{
    "token_type": "bearer",
    "expires_in": 315359969,
    "exp": 2069346816,
    "scope": "tasks:read tasks:write projects:read projects:write openid email profile",
    "active": true
}
Details of each property:
| Property | Description |
|---|---|
token_type | The type of tokenbearer (OAuth access token, personal access token, or service account) or refresh (OAuth refresh token) |
expires_in | The number of seconds that the token is valid. OAuth access tokens expire in 1 hour (3600 seconds) |
exp | The unix timestamp (integer timestamp, number of seconds since January 1, 1970 UTC) indicating when this token will expire. |
scope | A JSON string containing a space-separated list of scopes associated with this token. |
active | Boolean indicating whether or not the token is still valid. false if the token has expired or been revoked / deauthorized. |
client_id | Associated OAuth app / client id. This is returned only for OAuth access tokens and OAuth refresh tokens |
Security considerations
PKCE OAuth extension
PKCE (proof key for code exchange) proves the app that started the authorization flow is the same app that finishes the flow. You can read more about it here: Protecting Apps with PKCE.
In short, the process is as follows:
- Whenever a user wants to OAuth with Asana, your app server should generate a random string called the
code_verifier. This string should be saved to the user, since everycode_verifiershould be unique per user. This should stay in the app server and only be sent to the token exchange endpoint. - Your app server will hash the
code_verifierwith SHA256 to get a string called thecode_challenge. Your server will give the browser only thecode_challenge&code_challenge_method. Thecode_challenge_methodshould be the string "S256" to tell Asana we hashed with SHA256. More specifically,code_challenge = BASE64URL-ENCODE(SHA256(ASCII(code_verifier))). - The browser includes
code_challenge&code_challenge_methodwhen redirecting to the user authorization endpoint:
{
  ...

  "code_challenge": "671608a33392cee13585063953a86d396dffd15222d83ef958f43a2804ac7fb2",
  "code_challenge_method": "S256"
}- The app server should include the
code_verifierin its request to the token exchange endpoint.
Asana confirms that hashing the code_verifier with the code_challenge_method results in the code_challenge. This proves to Asana the app that hit the user authorization endpoint is the same app that hit the token exchange endpoint:
{
  ...

  "code_verifier": "fdsuiafhjbkewbfnmdxzvbuicxlhkvnemwavx"
}
Secure redirect endpoint
As the redirect from the authorization endpoint in either grant procedure contains a code that is secret between Asana's authorization servers and your application, this response should not occur in plaintext over an unencrypted http connection. Because of this, we enforce the use of https redirect endpoints for application registrations.
For non-production or personal use, you may wish to check out stunnel, which can act as a proxy to receive an encrypted connection, decrypt it, and forward it on to your application. For development work, you may wish to create a self-signed SSL/TLS certificate for use with your web server; for production work we recommend purchasing a certificate from a certificate authority. You may review a short summary of the steps for each of these processes here.
Your application will need to be configured to accept SSL/TLS connections for your redirect endpoint when users become authenticated. For many apps, this will simply require a configuration update of your application server. Instructions for Apache and Nginx can be found on their respective websites, and most popular application servers will contain documentation on how to proceed.
Troubleshooting
Forbidden scopes: Full permissions
Error:forbidden_scopes: Your app is not allowed to request user authorization for default identity scopes
Your app is requesting Full permissions (the default scope), but is not registered for Full permissions in the developer console.
- If you would like to request Full permissions: toggle on Full Permissions under OAuth > Permission Scopes in the developer console.
- If you would like to use scopes to limit access:
- Select your desired scopes under OAuth > Permissions in the developer console and save.
- Specify scopes in the
scopequery parameter at thehttps://app.asana.com/-/oauth_authorizepage. More on this here.
Forbidden scopes despite full permissions
Example error: forbidden_scopes: Your app is not allowed to request user authorization for 'attachments:read' scopes.
Your app has Full permissions enabled in the developer console, but you are specifying individual scopes in the authorization URL. When Full permissions is enabled, you cannot request specific scopes.
- If you would like to keep Full permissions: Remove the
scopequery parameter from your authorization URL, or usescope=default. - If you would like to use specific scopes:
- Disable Full permissions in the developer console under OAuth > Permission scopes.
- Select only the required scopes and save your changes.
- Specify your chosen scopes in the
scopequery parameter at the authorization endpoint. Note that you may request a subset of your registered scopes.
Updated 10 months ago