
Quick start guide
Get started with the API and make your first request
Introduction
The Asana API helps ensure all of your information is up to date and that your teams stay efficient and in-the-loop. It provides a means for software and scripts to read information from inside Asana, input information from outside Asana, and automatically react when things change. This can include:
- Consistently doing repetitive or tedious tasks
- Creating reports on the state of tasks and projects
- Staying in sync with other software used in your organization (e.g., Slack, Salesforce, etc.)
After following this tutorial, you will be able to leverage the API to perform create, read, update, and delete (i.e., CRUD) operations on data in your Asana instance.
Quick highlightsIf you already have a deep understanding of APIs or need a brief review of Asana's API, you may wish to skip ahead to the quick highlights of this guide below:
- The Asana API is a RESTful interface with predictable resource-oriented URLs, accepts JSON or form-encoded requests, returns JSON, and uses standard HTTP features (verbs, response codes, etc.)
- The API reference is comprehensive reference for objects, schemas, and endpoints available in the API
- To quickly authorize your API requests, create a personal access token via the developer console
- API endpoints are relative to the following base URL:
https://app.asana.com/api/1.0- Some requests return compact representations of objects in order to conserve resources and complete the request more efficiently. See input/output options to customize your responses
- For requests that query for multiple objects, pagination is strongly recommended
- Beyond cURL, you can make API requests with the API explorer, Postman Collection, and client libraries
Prerequisites
Asana's API is a RESTful interface, providing programmatic access to much of the data in your workspace. To make sure you are well-prepared to begin building with this guide, you should have experience with REST principles. The API provides predictable URLs for accessing resources, and uses built-in HTTP features to receive commands and return JSON responses.
Additionally, this guide makes use of cURL, a command line program for making HTTP requests. MacOS and many Linux distributions have cURL pre-installed, and it is also available for download on Windows and many other operating systems.
Setup
To begin using the API, you'll first need to complete two brief setup steps:
Get a personal access token
Similar to entering your username/password into a website or logging into Asana with Google, when you access your Asana data via the API, you need to authenticate. The quickest method to do so is by using a personal access token (PAT), which you can think of as your unique password for accessing the API.
To create a new personal access token:
- Open the developer console
Accessing the developer consoleAlong with link above, the developer console is also accessible by clicking on the My apps at the top of this page.
Within the Asana app, you may access the developer console by clicking on your profile photo (on the top right), then selecting My Settings > Apps > Manage Developer Apps.
For more details on the developer console, see its documentation here.
- Select + Create new token
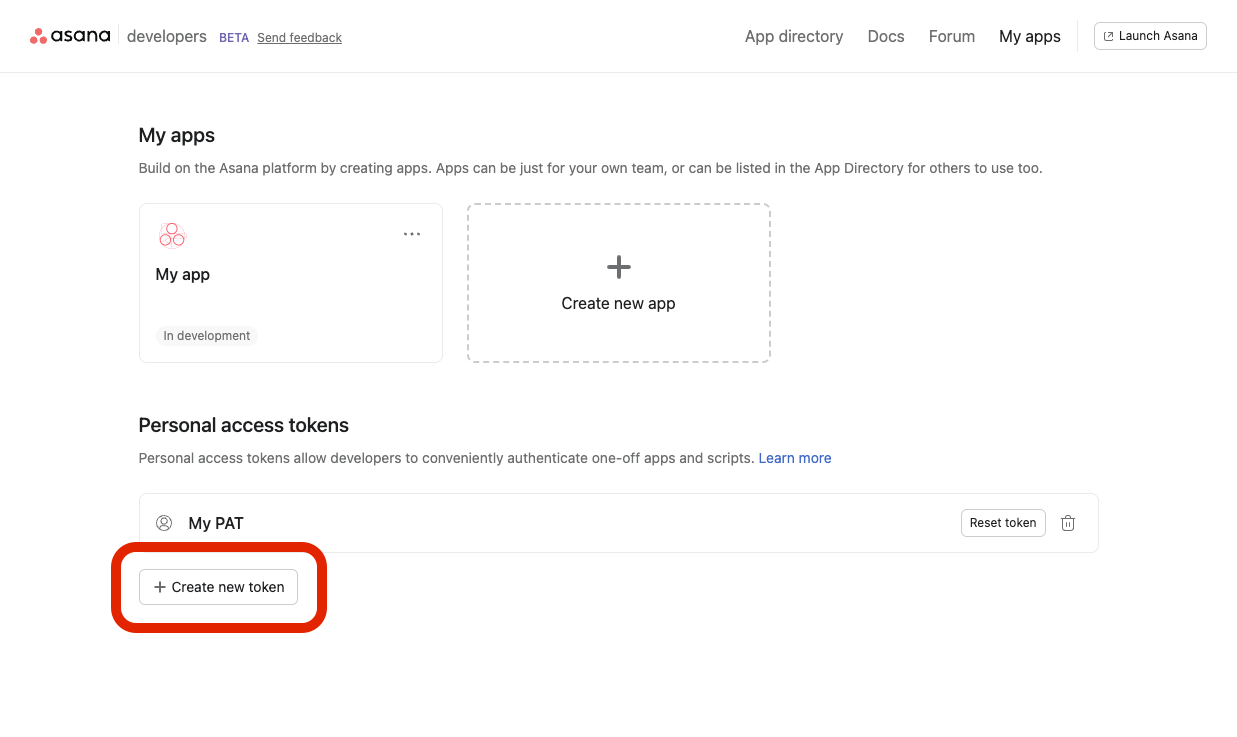
-
Enter a Token name (e.g., what you’ll use this token for)
-
Click Create token
-
Copy your token and store it securely. You will only see this token displayed one time, but you can always reset this PAT (or create another PAT) later
Keep your personal access token secureTreat your PAT like you would treat a password. Do not share it and do not display it online.
Now that you have a personal access token, you'll need to get your workspace GID as well.
Get your workspace GID
A workspace is the highest organizational unit in Asana. Since all objects (tasks, projects, teams, etc.) have an associated workspace, you'll need to know your globally unique identifier (i.e., workspace GID) in order to perform operations on objects in your workspace. The quickest way to do so is by logging in to Asana, then visiting this URL directly in your browser:
https://app.asana.com/api/1.0/workspaces
Under the hood, your browser is making a GET request to an API endpoint that retrieves all workspaces visible to the authorized user. As a result of the request, Asana returns a 200 response similar to the following:
{
  "data": [
    {
      "gid": "67890",
      "resource_type": "task",
      "name": "My Company Workspace"
    }
  ],
  "next_page": {
    "offset": "eyJ0eXAiOJiKV1iQLCJhbGciOiJIUzI1NiJ9",
    "path": "/tasks/12345/attachments?limit=2&offset=eyJ0eXAiOJiKV1iQLCJhbGciOiJIUzI1NiJ9",
    "uri": "https://app.asana.com/api/1.0/tasks/12345/attachments?limit=2&offset=eyJ0eXAiOJiKV1iQLCJhbGciOiJIUzI1NiJ9"
  }
}
Developer sandboxNote that by making API requests against data in your workspace, you will be operating on real data in that workspace. If you wish to have a separate working environment and instead operate on "test" data, we recommend using a developer sandbox. For additional details and to request your own, see developer sandbox.
In the array of individual workspace objects above, you'll need the gid value for the workspace in which you'll work in. For this example, the globally unique identifier for this workspace (i.e., the workspace GID) is "67890".
After getting your personal access token and workspace GID, you are ready to begin making your first API request!
Making API requests
Along with its RESTful interface, the Asana API accepts JSON or form-encoded content in requests and returns JSON content in all of its responses, including errors. Only UTF-8 character encoding is supported for both requests and responses.
Through the rest of this guide, you'll learn how to perform create, read, update, and delete (i.e., CRUD) operations on one of the most fundamental objects in Asana: a task.
1. Create a task
API endpointThe API endpoint for creating a task is
POST/tasks
In this example, we'll use the Asana API to create a new task with the following properties:
- The task is associated with your
workspace - The title (i.e.,
name) of the task is "Sample task" - The user assigned to the task (i.e., its
assignee) is yourself
Request
The base URL for all requests to the Asana API is:
https://app.asana.com/api/1.0Every API request you make will start with the same base URL. In this documentation, we'll generally refer to the URL by its resource or relative path. For instance, when we say /users, we are using this as a shorthand for the entire URL: https://app.asana.com/api/1.0/users.
Now, since we want to operate on tasks, the full URL in our case becomes:
https://app.asana.com/api/1.0/tasksWe'll make a POST request to that URL, which serves as our API endpoint for creating a task. In the header, we'll authorize the request with our personal access token. For our POST body, we'll send a data object that encapsulates the three fields that we want to set: workspace, name, and assignee.
curl --request POST \
     --url 'https://app.asana.com/api/1.0/tasks' \
     --header 'accept: application/json' \
     --header 'authorization: Bearer ACCESS_TOKEN' \
     --header 'content-type: application/json' \
     --data '
{
  "data": {
    "workspace": "WORKSPACE_GID",
    "name": "Sample task",
    "assignee": "me"
  }
}
'
const Asana = require('asana');
let client = Asana.ApiClient.instance;
let token = client.authentications['token'];
token.accessToken = 'ACCESS_TOKEN';
let tasksApiInstance = new Asana.TasksApi();
let body = {
"data": {
"workspace": "WORKSPACE_GID",
"name": "Sample task",
"assignee": "me",
}
};
let opts = {};
tasksApiInstance.createTask(body, opts).then((result) => {
console.log(JSON.stringify(result.data, null, 2));
}, (error) => {
console.error(error.response.body);
});// This sample code utilizes node-asana v1.0.2 -> npm install [email protected]
const asana = require("asana");
const client = asana.Client.create().useAccessToken("ACCESS_TOKEN");
client.tasks
.createTask({
workspace: "WORKSPACE_GID",
name: "Sample task",
assignee: "me",
})
.then((result) => {
console.log(result);
});import asana
from asana.rest import ApiException
from pprint import pprint
configuration = asana.Configuration()
configuration.access_token = 'ACCESS_TOKEN'
api_client = asana.ApiClient(configuration)
tasks_api_instance = asana.TasksApi(api_client)
body = {"data": {"workspace": "WORKSPACE_GID", "name": "Sample task", "assignee": "me"}}
opts = {}
try:
task = tasks_api_instance.create_task(body, opts)
pprint(task)
except ApiException as e:
print("Exception when calling TasksApi->create_task: %s\n" % e)import asana
client = asana.Client.access_token('ACCESS_TOKEN')
result = client.tasks.create_task(
{'workspace': 'WORKSPACE_GID', 'name': 'Sample task', 'assignee': 'me'})
print(result)require "asana"
client = Asana::Client.new do |c|
c.authentication :access_token, "ACCESS_TOKEN"
end
result = client.tasks.create_task(workspace: "WORKSPACE_GID", name: "Sample task", assignee: "me")
print resultNote that for this request to work correctly, you must replaceACCESS_TOKEN and WORKSPACE_GID with your own actual token and workspace GID, respectively.
Response
After requesting information from the API, you will receive a response in JSON format. In our specific case, the API returns a 201 Created response status code, indicating that the request was successful and led to the creation of a resource. That is, a task with a gid value is "987654321" was created (if making your own request, note that the value for your task's gid, among the values for other properties, will be different):
{
  "data": {
    "gid": "987654321",
    "projects": [],
    "memberships": [],
    "resource_type": "task",
    "created_at": "2023-03-16T23:29:49.944Z",
    "modified_at": "2023-03-16T23:29:50.004Z",
    "name": "Sample task",
    "notes": "",
    "completed": false,
    "assignee_status": "inbox",
    "completed_at": null,
    "due_on": null,
    "due_at": null,
    "resource_subtype": "default_task",
    "start_on": null,
    "start_at": null,
    "tags": [],
    "workspace": {
      "gid": "67890",
      "resource_type": "workspace",
      "name": "My Company Workspace"
    },
    "num_hearts": 0,
    "num_likes": 0,
    "permalink_url": "https://app.asana.com/0/67890/12345",
    "assignee": {
      "gid": "12345",
      "resource_type": "user",
      "name": "Greg Sanchez"
    },
    "parent": null,
    "hearted": false,
    "hearts": [],
    "liked": false,
    "likes": [],
    "followers": [
      {
        "gid": "12345",
        "resource_type": "user",
        "name": "Greg Sanchez"
      }
    ],
    "assignee_section": {
      "gid": "12345",
      "resource_type": "section",
      "name": "Recently assigned"
    },
    "custom_fields": []
  }
}
In the above snippet, the entire record of the newly-created task is returned. Since we only specified values for three properties in our request (i.e., workspace, name, and assignee), any unspecified fields (e.g., projects, notes, etc.) took on default values when the task got created. See POST /tasks for a full list of request parameters and response schemas (i.e., data models).
Now that we've seen how we create a task, let's see how we can get (i.e., read) a task through the API.
2. Get a task
API endpointThe API endpoint for getting a task is
GET/tasks/{task_gid}
In this example, let's retrieve the newly-created task from earlier. However, this time, we'll use input/output options to specify the fields we want returned in the response.
Request
Recall that the gid value was "987654321". To make the GET request for a single task, we'll add the gid as a path parameter:
https://app.asana.com/api/1.0/tasks/987654321Some API requests return "compact" representations of objects in order to conserve resources and complete the request more efficiently. Other times, requests return more information than you may need. With input/output options, we can provide a list of the exact set of fields that the API should be sure to return for the objects.
In this example, let's say that rather than being returned the entire task object (as we saw when we created the task), we want the API to only return certain fields of the task after we make our request: the task's name, assignee, and workspace. As such, we can append opt_fields` as a query parameter in the URL:
https://app.asana.com/api/1.0/tasks/987654321?opt_fields=name,assignee,workspaceHere's how we can make a GET request to the API endpoint above:
curl --request GET \
     --url https://app.asana.com/api/1.0/tasks/TASK_GID?opt_fields=name,assignee,workspace \
     --header 'accept: application/json' \
     --header 'authorization: Bearer ACCESS_TOKEN'
const Asana = require('asana');
let client = Asana.ApiClient.instance;
let token = client.authentications['token'];
token.accessToken = 'ACCESS_TOKEN';
let tasksApiInstance = new Asana.TasksApi();
let task_gid = "TASK_GID";
let opts = {
'opt_fields': "name,assignee,workspace",
};
tasksApiInstance.getTask(task_gid, opts).then((result) => {
console.log(JSON.stringify(result.data, null, 2));
}, (error) => {
console.error(error.response.body);
});// This sample code utilizes node-asana v1.0.2 -> npm install [email protected]
const asana = require("asana");
const client = asana.Client.create().useAccessToken("ACCESS_TOKEN");
client.tasks
.getTask(TASK_GID, {
fields: "name,assignee,workspace",
})
.then((result) => {
console.log(result);
});import asana
from asana.rest import ApiException
from pprint import pprint
configuration = asana.Configuration()
configuration.access_token = 'ACCESS_TOKEN'
api_client = asana.ApiClient(configuration)
tasks_api_instance = asana.TasksApi(api_client)
task_gid = "TASK_GID"
opts = {
'opt_fields': "name,assignee,workspace"
}
try:
task = tasks_api_instance.get_task(task_gid, opts)
pprint(task)
except ApiException as e:
print("Exception when calling TasksApi->get_task: %s\n" % e)import asana
client = asana.Client.access_token("ACCESS_TOKEN")
result = client.tasks.get_task(
"TASK_GID", fields="name,assignee,workspace")
print(result)require "asana"
client = Asana::Client.new do |c|
c.authentication :access_token, "ACCESS_TOKEN"
end
result = client.tasks.get_task(task_gid: "TASK_GID", options: { fields: ["name", "assignee", "workspace"] })
print resultNote that for this request to work correctly, you must replaceACCESS_TOKEN and TASK_GID ("987654321" in this example) with your own actual token and task GID, respectively.
Response
As a result of the above request, the API returns 200 OK response with a compact record of the task (i.e., with only the three fields that we opted in to). It should look something like this:
{
  "data": {
    "gid": "987654321",
    "assignee": {
      "gid": "12345",
      "resource_type": "user"
    },
    "name": "Sample task",
    "workspace": {
      "gid": "67890",
      "resource_type": "workspace"
    }
  }
}
See GET /tasks/{task_gid} for a full list of request parameters and response schemas (i.e., data models).
After creating a task and retrieving it with the API, let's now explore how we can modify (i.e., update) an existing task.
3. Update a task
API endpointThe API endpoint for updating a task is
PUT/tasks/{task_gid}
In this example, we'll modify an existing task by setting a updated value for its title (i.e., name).
Request
Recall that for the task in the previous example (i.e., whose gid is "987654321"), we provided "Sample task" as the value for its name when we created that task. Here's how we might make a PUT request to modify that existing value for the task's name:
curl --request PUT \
     --url 'https://app.asana.com/api/1.0/tasks/TASK_GID?opt_fields=name,assignee,workspace' \
     --header 'accept: application/json' \
     --header 'authorization: Bearer ACCESS_TOKEN' \
     --header 'content-type: application/json' \
     --data '
{
  "data": {
    "name": "Modified task"
  }
}
'
const Asana = require('asana');
let client = Asana.ApiClient.instance;
let token = client.authentications['token'];
token.accessToken = 'ACCESS_TOKEN';
let tasksApiInstance = new Asana.TasksApi();
let body = {
"data": {
"name": "Modified task",
}
};
let task_gid = "TASK_GID";
let opts = {
'opt_fields': "name,assignee,workspace",
};
tasksApiInstance.updateTask(body, task_gid, opts).then((result) => {
console.log(JSON.stringify(result.data, null, 2));
}, (error) => {
console.error(error.response.body);
});// This sample code utilizes node-asana v1.0.2 -> npm install [email protected]
const asana = require("asana");
const client = asana.Client.create().useAccessToken("ACCESS_TOKEN");
client.tasks
.updateTask(TASK_GID, {
name: "Modified task",
fields: "name,assignee,workspace",
})
.then((result) => {
console.log(result);
});import asana
from asana.rest import ApiException
from pprint import pprint
configuration = asana.Configuration()
configuration.access_token = 'ACCESS_TOKEN'
api_client = asana.ApiClient(configuration)
tasks_api_instance = asana.TasksApi(api_client)
body = {"data": {"name": "Modified task",}}
task_gid = "TASK_GID"
opts = {
'opt_fields': "name,assignee,workspace"
}
try:
task = tasks_api_instance.update_task(body, task_gid, opts)
pprint(task)
except ApiException as e:
print("Exception when calling TasksApi->update_task: %s\n" % e)import asana
client = asana.Client.access_token(
'ACCESS_TOKEN')
result = client.tasks.update_task(
"TASK_GID", {"name": "Modified task"}, fields="name,assignee,workspace")
print(result)require "asana"
client = Asana::Client.new do |c|
c.authentication :access_token, "ACCESS_TOKEN"
end
result = client.tasks.update_task(task_gid: "TASK_GID", name: "Modified task", options: { fields: ["name", "assignee", "workspace"] })
print resultNote that for this request to work correctly, you must replaceACCESS_TOKEN and TASK_GID ("987654321" in this example) with your own actual token and task GID, respectively.
In the above request, we're also using opt_fields as we did previously in order to get a more compact response from the API. Beyond that, we're simply sending a data object in the request body with the properties that we wish to update. In this case, we requesting to update the task's name from "Sample task" to "Modified task".
Response
As a result of the above request, the API returns a 200 OK status as well as a compact representation of the newly-updated task object. Note that the name has changed as we specified (i.e., from "Sample task" to "Modified task", while the other properties remain unchanged:
{
  "data": {
    "gid": "987654321",
    "name": "Modified task",
    "assignee": {
      "gid": "12345",
      "resource_type": "user"
    },
    "workspace": {
      "gid": "67890",
      "resource_type": "workspace"
    }
  }
}
It is important to note that with update requests, only the fields provided in the data object in the request body will be updated; any unspecified fields will remain unchanged. See PUT /tasks/{task_gid} for a full list of request parameters and response schemas (i.e., data models).
Finally, let's see how we can delete an existing task.
4. Delete a task
API endpointThe API endpoint for deleting a task is
DELETE/tasks
Along with creating, reading, and updating objects, you can also delete objects through the API as well.
Request
Similar to the way that you GET an existing task, you can DELETE an existing task by making a DELETE request with the task GID as a path parameter. Using our previous example, the complete URL for such a request would look like:
https://app.asana.com/api/1.0/tasks/987654321Here's the complete request:
curl --request DELETE \
     --url https://app.asana.com/api/1.0/tasks/TASK_GID \
     --header 'accept: application/json' \
     --header 'authorization: Bearer ACCESS_TOKEN'
const Asana = require('asana');
let client = Asana.ApiClient.instance;
let token = client.authentications['token'];
token.accessToken = 'ACCESS_TOKEN';
let tasksApiInstance = new Asana.TasksApi();
let task_gid = "TASK_GID";
tasksApiInstance.deleteTask(task_gid).then((result) => {
console.log(JSON.stringify(result.data, null, 2));
}, (error) => {
console.error(error.response.body);
});// This sample code utilizes node-asana v1.0.2 -> npm install [email protected]
const asana = require("asana");
const client = asana.Client.create().useAccessToken("ACCESS_TOKEN");
client.tasks.deleteTask(TASK_GID).then((result) => {
console.log(result);
});import asana
from asana.rest import ApiException
from pprint import pprint
configuration = asana.Configuration()
configuration.access_token = 'ACCESS_TOKEN'
api_client = asana.ApiClient(configuration)
tasks_api_instance = asana.TasksApi(api_client)
task_gid = "TASK_GID"
try:
task = tasks_api_instance.delete_task(task_gid)
pprint(task)
except ApiException as e:
print("Exception when calling TasksApi->delete_task: %s\n" % e)import asana
client = asana.Client.access_token("ACCESS_TOKEN")
result = client.tasks.delete_task("TASK_GID")require "asana"
client = Asana::Client.new do |c|
c.authentication :access_token, "ACCESS_TOKEN"
end
result = client.tasks.delete_task(task_gid: "TASK_GID")
print resultNote that for this request to work correctly, you must replaceACCESS_TOKEN and TASK_GID ("987654321" in this example) with your own actual token and task GID, respectively.
Response
As a result of the above request, the API returns 200 OK status and an empty data record, signifying a successful deletion:
{
  "data": {}
}
For more information on task deletion, see GET /tasks/{task_gid} in the API reference.
More ways to make API requests
In addition to making basic requests in your terminal via cURL, Asana also offers many other ways to make API requests:
API explorer
Asana's REST API reference allows you to explore different REST API endpoints through an in-context, easy-to-use interface. Using this built-in API explorer, you can make API requests (and view responses) directly in your browser.
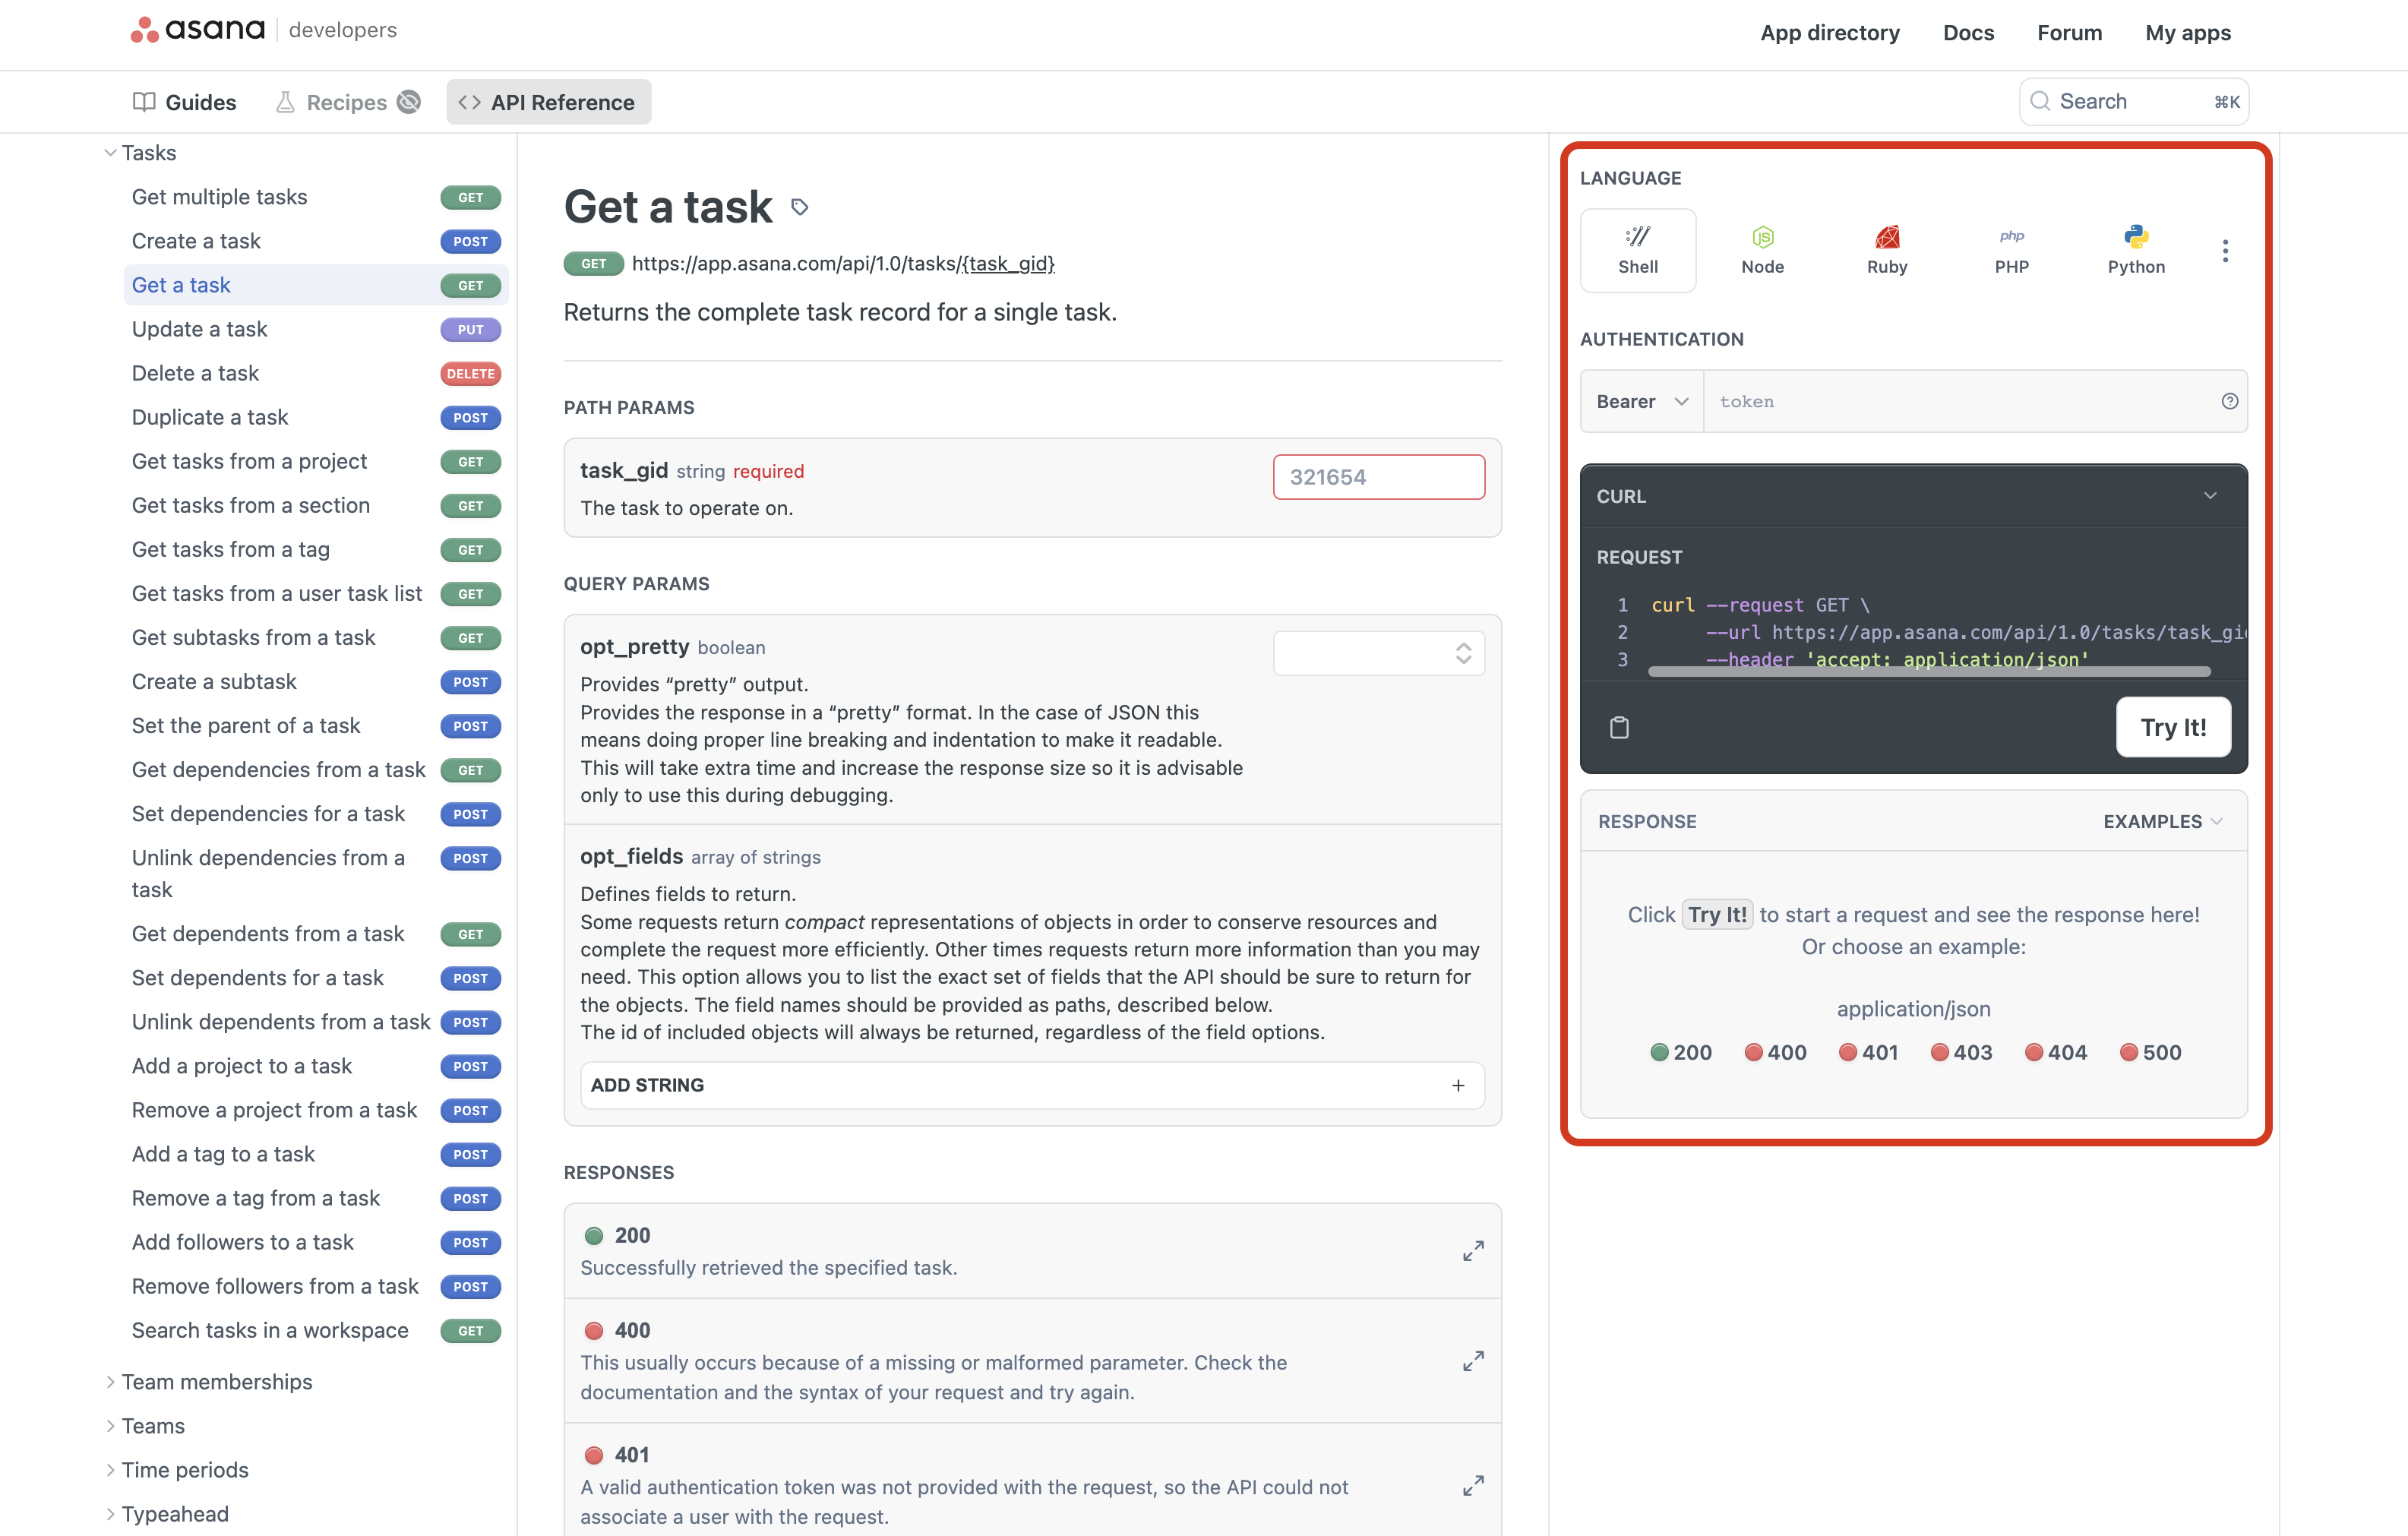
For more details, see the documentation for the API explorer.
Postman Collection
If you prefer a convenient way to make requests on your local machine (i.e., instead of in your browser) with an interactive UI, we recommend using Postman.
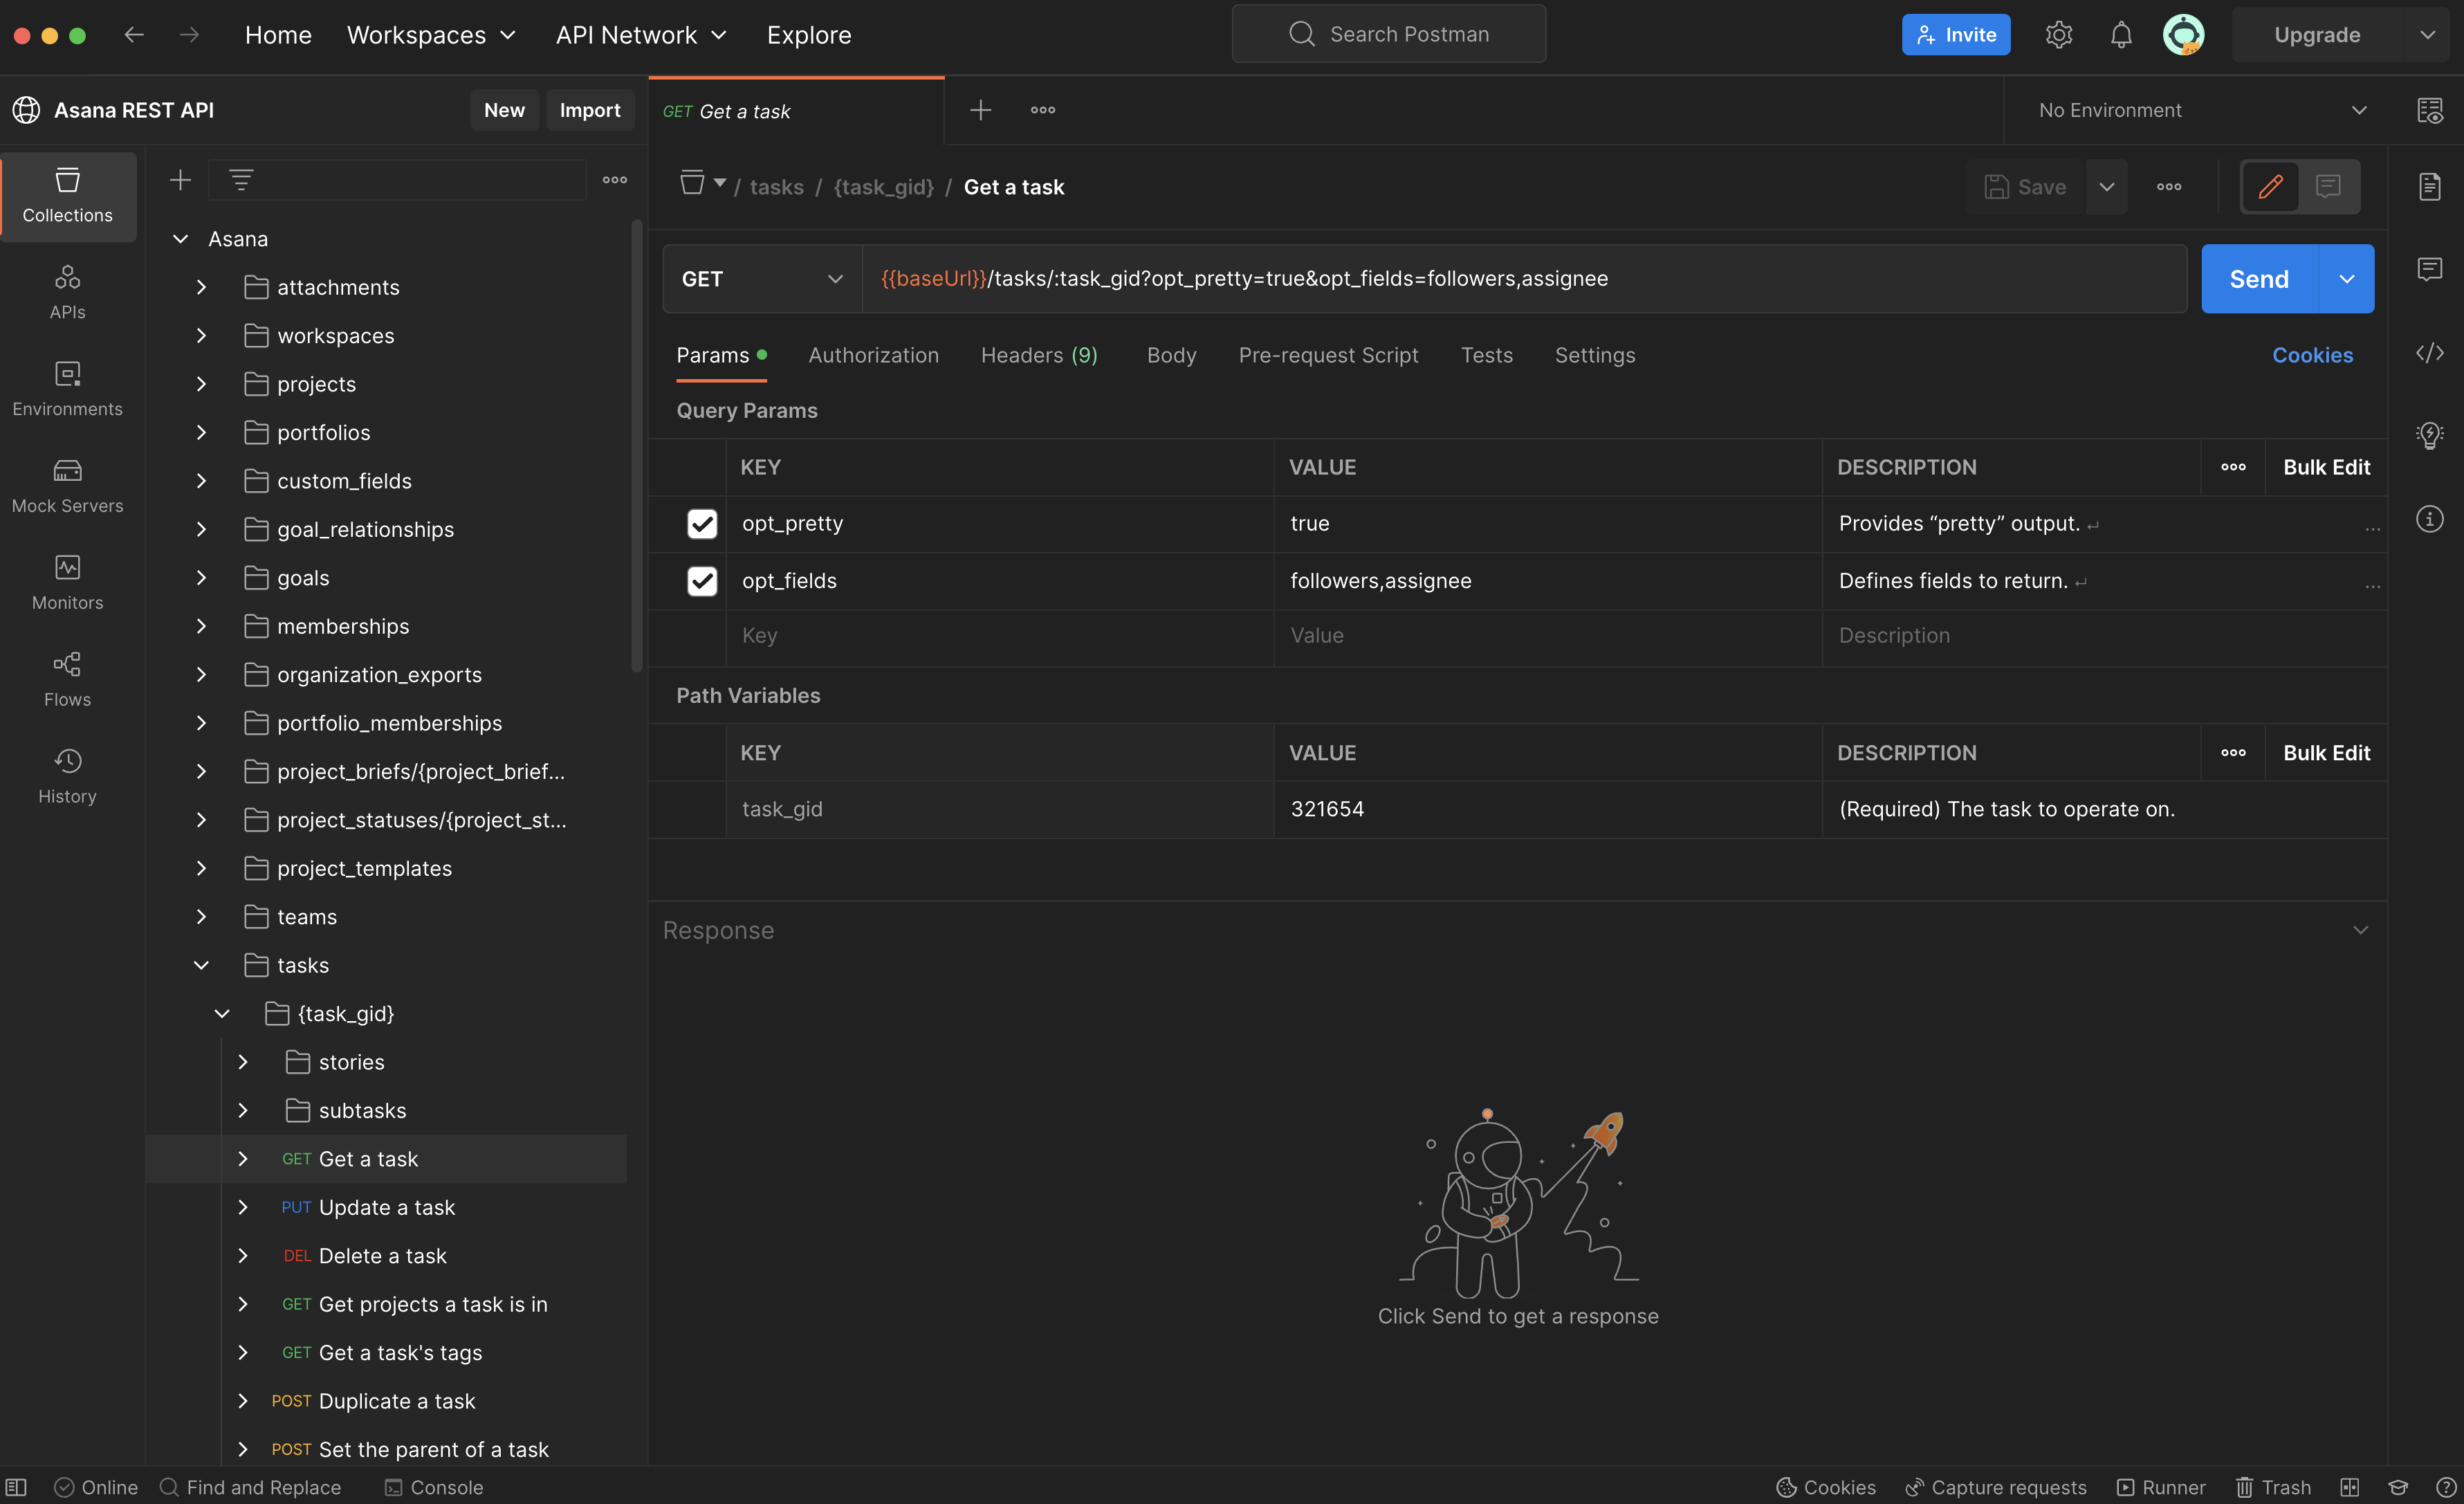
Visit the Postman Collection documentation to get started.
Client libraries
Asana offers official client libraries in several popular coding languages. Visit the client libraries documentation to get started.
Next steps
At this point, you are ready to begin development against the API! These same operations that you performed on a task through the API (i.e., create, read, update, delete) can be applied to many other objects in your Asana instance as well (e.g., projects, portfolios, etc.). Visit the API reference for a comprehensive reference of objects, schemas, and endpoints available in the API.
To get started on building custom apps, visit its documentation. To see more of what you can do with Asana's API, check out these open source examples, or visit the app directory to see what others have built on the Asana platform.
Updated 7 months ago